Products
Solutions
Resources
9977 N 90th Street, Suite 250 Scottsdale, AZ 85258 | 1-800-637-7496
© 2024 InEight, Inc. All Rights Reserved | Privacy Statement | Terms of Service | Cookie Policy | Do not sell/share my information

In InEight Estimate, a job represents the folder containing your estimate (or version of your estimate), including its related bid items, cost breakdown structure, resources, quotes, and change logs. All the jobs in your organization are stored in the Job Register.
To create a new job, select File and then New in the InEight Estimate Backstage view. You can then choose from several job creation options. The image and table below show the available options.

| Option | Description |
|---|---|
| Scratch | Creates a new job folder from scratch that is empty, containing no existing data. |
| Template | Creates a job from an existing template from the Template Register. For more information, see Templates. |
| Existing Job | Creates a job from an existing job from the Job Register. For more information, see Copy an existing job. |
| Bid Wizard | Uses a wizard tool to create a new job by selecting pay items and/or cost items from an existing source job. For more information, see Bid wizard. |
| Archive | Creates a new job from an Estimate Job Archive (.est) File. For more information on creating and using job archives, see Archive and restore jobs. |
| Snapshot | Creates a new job from a register containing snapshots for all jobs. You can filter the register of snapshots to find the snapshot you need. For more information, see Snapshots. |
When you need a clean estimating environment that is not based on any past work, select Scratch. Creating a job from scratch gives you complete flexibility and ensures that no assumptions are carried forward from past estimates.
When you create a job, it must be associated with a project in InEight Platform. The Platform project represents the overall construction project being managed by your organization, from planning through execution and turnover.
The association to a project in Platform promotes data consistency, helps ensure that the data is being pulled from a single source of truth, and reduces duplicate entries.
Fields in Setup > Job Properties > Overview that are maintained in Platform and integrate into Estimate include Project ID, Organization, Project Name, and Project Notes. Fields on the Cover Sheet tab such as Location, City, State, Country, Latitude, Longitude, Forecast Start, Forecast Finish, and Duration can also be maintained from the associated Platform project.
When modifications are made to integrated fields in Platform and then saved, the changes automatically appear in Estimate. For example, if you change the project name in Platform to reflect a new year or phase, that update appears in the Project Name field in Job Properties.
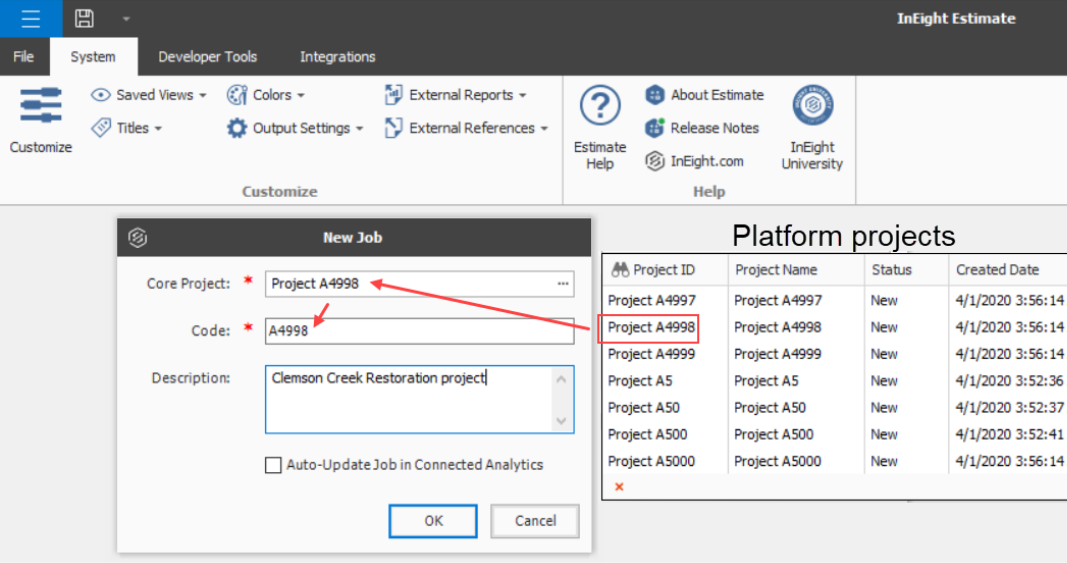
When creating a new job, select a project in the Core Project field in the New Job window to associate the job with its Platform project.
Associating Platform projects lets you organize estimates directly from Platform’s OBS. Because projects in Platform are organized in an OBS, associating your job (estimate) to a project in Platform allows your estimates to be included in that organizational structure.
The OBS represents the hierarchical structure a company uses to manage its business and can be broken down in multiple ways, such as Southwest or Northwest regions. Within those regions the hierarchy can be further broken down by divisions, such as Electrical, Paving, and Masonry. The organization can continue to be more refined to the level such as states, cities, districts.

After the job you create is associated to a Platform project, in the Job Register, you can view the job in the context of your OBS. In the example below, the job register is filtered to the Tantalum Group > Estimating > Site Work level of the organization. Under project ID number 5013592, you can see two jobs, the original estimate and a second version.

Your location assignment in the OBS determines the access you inherit and the visibility you have to other areas of the OBS.
For more information, see Job register overview.
From the Backstage view, select to create a new job from scratch.
In the New Job dialog box, click in the Core Project field to select a Platform job from the list.
Modify the Code field as needed.
Enter a description of the job in the Description field.
Determine if you want to select the Auto-Update Job in Connected Analytics check box.
Click OK to create the new project.
Additional Information
9977 N 90th Street, Suite 250 Scottsdale, AZ 85258 | 1-800-637-7496
© 2024 InEight, Inc. All Rights Reserved | Privacy Statement | Terms of Service | Cookie Policy | Do not sell/share my information